Installation
Understand the concepts of Users & Visitors at Apps > User Management
Visitor Flow
Let's say someone who has never visited your website or mobile app arrives for the first time. Their current identity is that of a Visitor.
- When you initialize our Frontend SDKs, we generate a unique Visitor ID (
anonymous_uid) and cache it on the visitor's device/browser. - If you call
identify(), data is saved against the Visitor Account's profile. - If you call
track(), events are tracked against the Visitor Account.
You don't have to call identify() before track(). The Visitor Account's profile is always created using the anonymous_uid if it doesn't exist yet.
User Signup Flow
Let's say the visitor now wishes to sign up for your app. Usually, this involves an API call to your app's backend.
- On your app's Database, a record is created representing the user. This record is identified by a Unique ID (
uid). - On DashX, a User Account needs to be created representing the same user. This usually happens in the Backend using the
identify()method.
Backend
- Node.js
- Spring Boot (Java)
- Python
- Ruby
dashx.identify('<USER ID>', {
    firstName: 'John',
    lastName: 'Doe',
    email: 'john@example.com'
});
dashX.identify(Map.of(
    "uid", "<USER ID>",
    "firstName", "John",
    "lastName", "Doe",
    "email", "john@example.com"
));
dashx.identify('<USER ID>', {
    first_name: 'John',
    last_name: 'Doe',
    email: 'john@example.com'
});
dashx.identify('<USER ID>', {
    first_name: 'John',
    last_name: 'Doe',
    email: 'john@example.com'
});
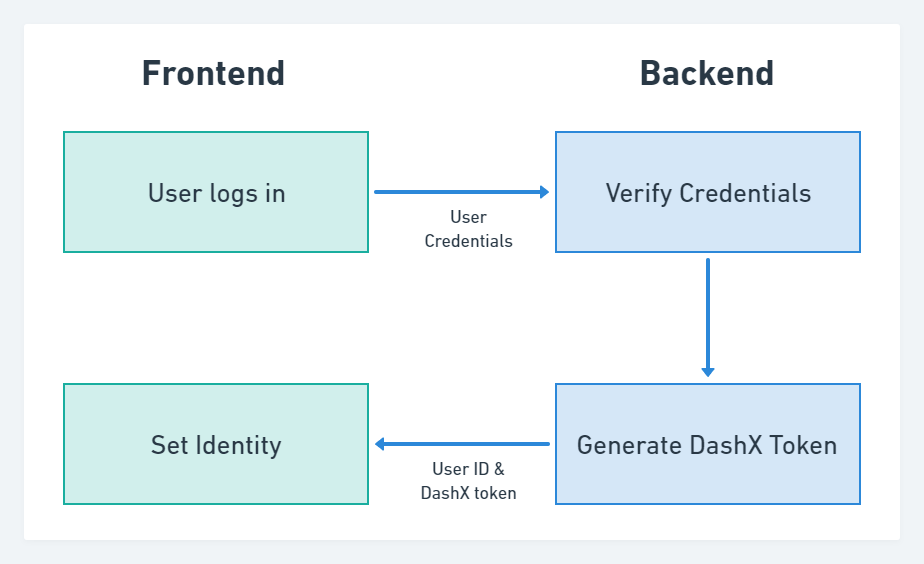
User Login Flow
Once someone logs in, their current identity is now a User.
Steps
On the Backend, you will need to generate the DashX Identity Token (JWT) for the logged-in User and send it back to the Frontend, along with the current User ID. Typically, the token is sent back either:
- Within your application JWT's payload
- Within a response to your application's Login API call (such as, a Session or User object)
- Within a response to a custom API call to generate the DashX Identity
On the Frontend, you will need to cache the User ID & DashX Identity Token in your user's device/browser, and then call setIdentity() within your application function that loads the currently logged-in session/user. Any subsequent SDK calls (such as identify() or track()) will be performed against the current User identity.
You can set user id without a token and still use public features/resources. The DashX Identity Token is a JWT generated and signed on your backend with your DashX private key (see below); setting it authorizes access to your private resources in DashX. Only add the token when the signed-in user should have that access, and handle it like a sensitive credential. On mobile, setIdentity’s token parameter is optional: if your product only ever uses public features/resources, do not set a token.
Backend
Your application backend can use JSON Web Token (JWT) to generate the DashX Identity Token. Make sure you've followed the Prerequisites before proceeding.
JWT payload must contain these three keys:
uid:id(primary key) of the User in your databasekind: Must be set toUSERexp: Expiry timestamp of the Identity Token (UNIX timestamp)
You must then use HS256 hashing algorithm to sign your JWTs with the Private Key obtained during the Prerequisites steps.
Below are the sample code snippets to generate JWTs in your application backend:
- Node.js
- Spring Boot (Java)
- Python
- Ruby
const jwt = require('jsonwebtoken');

const hmacSecret = '<YOUR PRIVATE KEY>';

const expiresAt = new Date();
expiresAt.setDate(expiresAt.getDate() + 7); // 1 week from now

const payload = {
    kind: 'USER',
    uid: '123',
    exp: Math.floor(expiresAt.getTime() / 1000)
};

const dashxIdentityToken = jwt.sign(payload, hmacSecret);
Check out the Node.js Demo App for a working example.
Add the JJWT dependency to your project:
Gradle:
dependencies {
    implementation 'io.jsonwebtoken:jjwt:0.9.1'
}
Maven:
<dependency>
    <groupId>io.jsonwebtoken</groupId>
    <artifactId>jjwt</artifactId>
    <version>0.9.1</version>
</dependency>
import io.jsonwebtoken.Jwts;
import io.jsonwebtoken.SignatureAlgorithm;
import java.util.Date;
import java.util.Map;

String hmacSecret = "<YOUR PRIVATE KEY>";

Date expiresAt = new Date(System.currentTimeMillis() + 7 * 24 * 60 * 60 * 1000L); // 1 week from now

String dashxIdentityToken = Jwts.builder()
    .setClaims(Map.of(
        "kind", "USER",
        "uid", "123"
    ))
    .setExpiration(expiresAt)
    .signWith(SignatureAlgorithm.HS256, hmacSecret.getBytes())
    .compact();
dashx.generate_identity_token('<USER ID>');
require 'active_support/all'
require 'date'
require 'jwt'

hmac_secret = '<YOUR PRIVATE KEY>'

expires_at = (DateTime.now + 1.week).to_time.to_i # 1 week from now

payload = {
    kind: 'USER',
    uid: '123',
    exp: expires_at
}

dashx_identity_token = JWT.encode payload, hmac_secret, 'HS256'
Important: It's up to your application to handle expiry of JWTs. It's a good idea to keep the same expiry duration as your application's own tokens / sessions. If the exp timestamp is not in future, DashX will refuse the token with the error: Incorrect Identity Token: Expired.
You should also refresh the Identity Token in your client applications before it expires by generating a new DashX Identity Token in your backend. You could refresh it along with your application's own tokens / sessions. Generally, if your tokens are expiring within, say, 1 week, then your application should attempt to generate another token from the backend well within this 1 week period.
Frontend (Browser)
- JavaScript
import dx from 'lib/dashx'

// ... within the function that loads your current user
dx.setIdentity('<USER ID>', '<DASHX IDENTITY TOKEN (JWT)>');
Frontend (Mobile)
- iOS
- Android
- React Native
DashX.setIdentity(uid: "<USER ID>", token: "<DASHX IDENTITY TOKEN (JWT)>")
DashX.setIdentity(uid = "<USER ID>", token = "<DASHX IDENTITY TOKEN (JWT)>")
import DashX from '@dashx/react-native';

DashX.setIdentity('<USER ID>', '<DASHX IDENTITY TOKEN (JWT)>');
User Logout Flow
Once a User logs out, their current identity switches back to a Visitor. A new unique Visitor ID (anonymous_uid) is generated. Any SDK calls (such as identify() or track()) will be performed against the new Visitor identity.
Steps
On the Backend, there is no concept of current identity, so nothing needs to be done here.
On the Frontend, simply call reset() at the end of your logout code.
Frontend (Browser)
- JavaScript
import dx from 'lib/dashx'

// ... within your logout() function
dx.reset();
Frontend (Mobile)
- iOS
- Android
- React Native
DashX.reset()
DashX.reset();
import DashX from '@dashx/react-native';

DashX.reset();